Workbench
George Dent explains how a layered approach to weathering has given a pair of Rapido’s excellent BR Fish vans a suitably lived-in appearance.
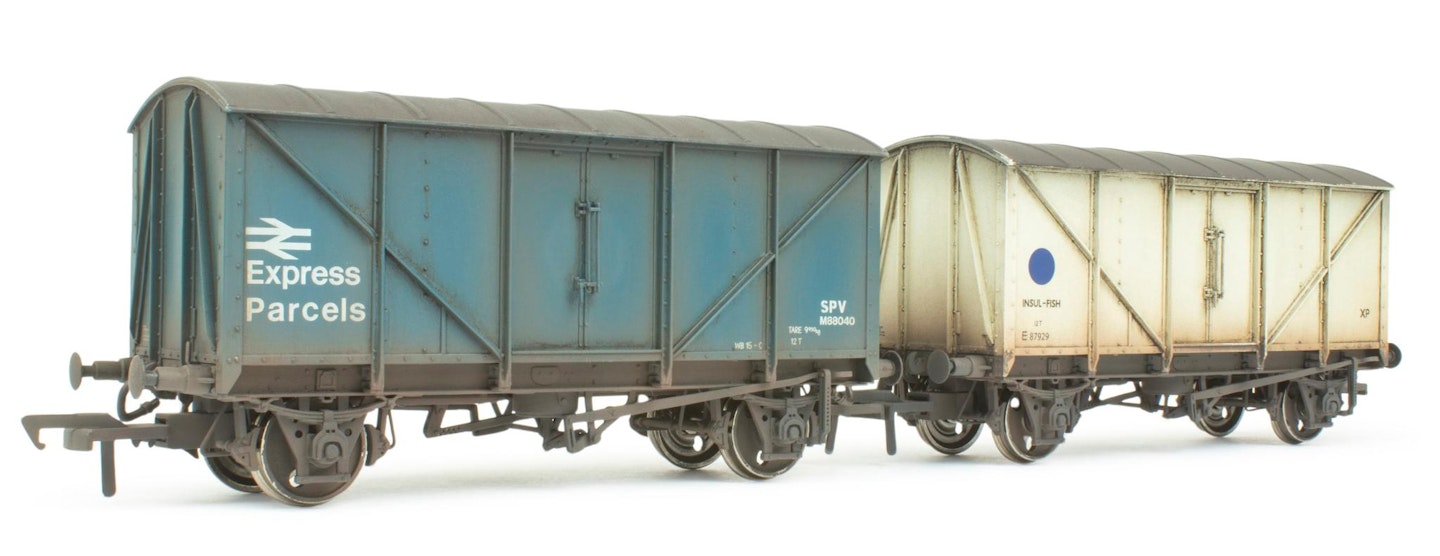
A layered approach to the weathering of these vans has produced an authentic, work-stained appearance. PHOTOGRAPHY: GEORGE DENT

What you will need
SHOPPING LIST
◆ Enamel weathering washes Light grey oil paint Thinners Paintbrushes Semi-gloss aerosol based clear coat
Availability: Model shops or www. scalemodelshop.co.uk
◆ LifeColor acrylic paints and dry pigments, airbrushes and equipment
Availability: www.airbrushes.com
◆ RailMatch Frame Dirt and Weathered Black enamel paints and thinners
Availability: www. gaugemasterretail.com
TOOLS
◆ Paintbrushes
◆ Cotton swabs (lots of them!)
◆ Airbrush and equipment (optional)
I’m a self-confessed wagon nerd at the best of times, but the arrival of Rapido’s BR Fish vans a few months ago really pricked my interest. As our review in the June issue (MR339) stated, the BR blue and Departmental versions produced by Rapido offer modellers of the 1970s and 1980s eras something a little different.
Although based on earlier designs, the BR Diagram 1/801 vans emerged in the early 1960s, designed for the speedy carriage of freshly landed fish from coastal ports to urban centres, most notably to London’s fish markets. The long wheelbase chassis, roller bearings and provision of vacuum brakes and through steam pipes, the vans could operate within express freight or passenger services, while the insulated bodywork kept the produce as fresh as possible.
Alas, rail-borne fish traffic plummeted during the 1960s, thanks to the development of road transport alternatives, ceasing altogether in 1968. As a result, these relatively new vans were pressed into use on other commodities, with the high-speed facility lending them to parcels traffic. Many examples were also cascaded into the Departmental fleet, for use as tool and equipment vans.
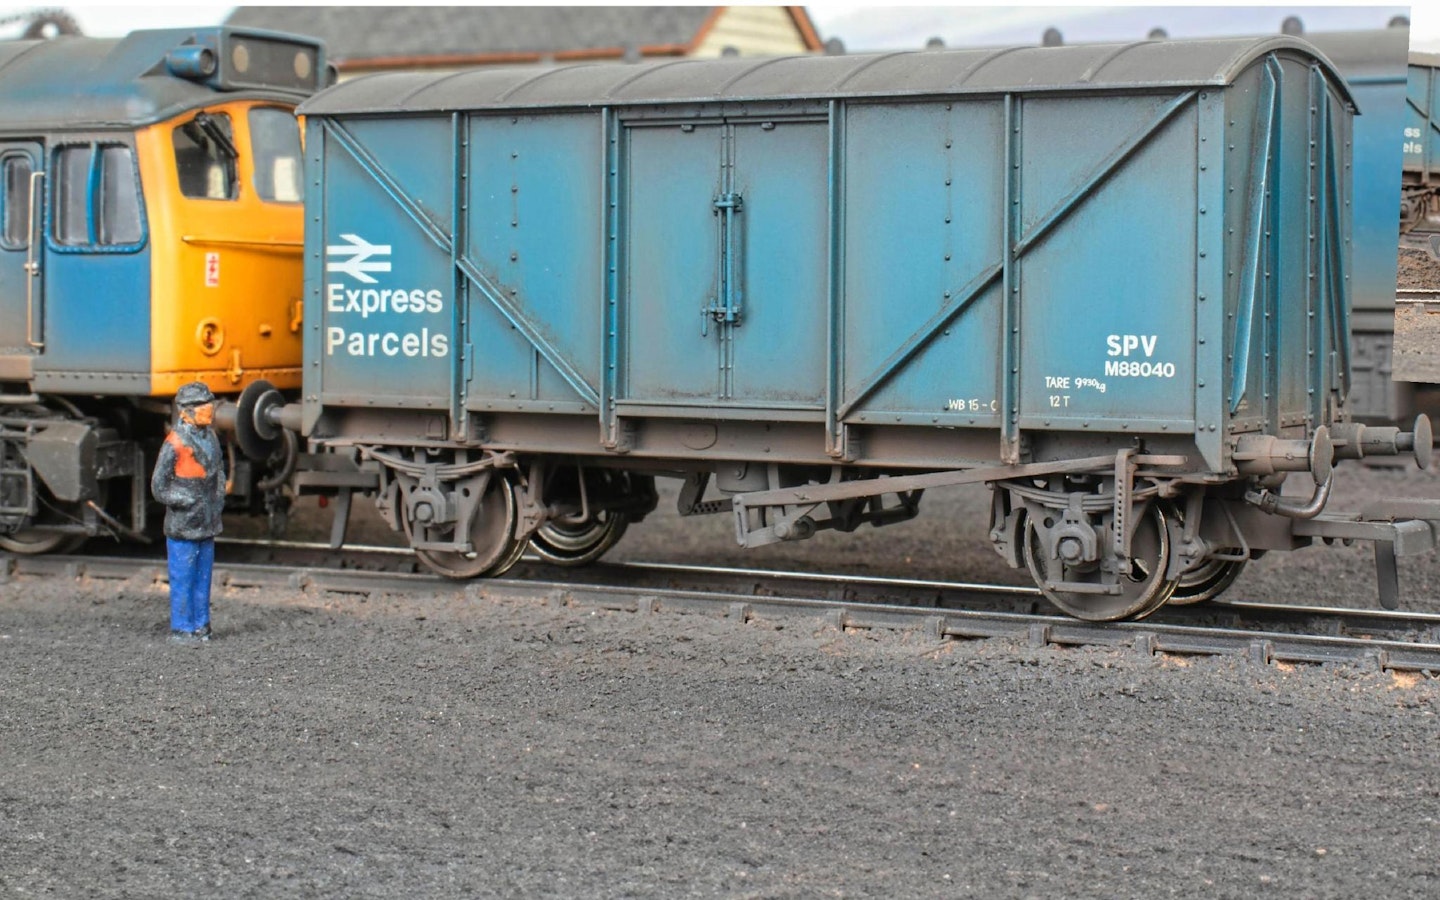
Indeed, it’s their use in parcels traffic that has long fascinated me, as I love collecting shabby rail blue stock for my mail and newspaper trains, which are hauled by equally careworn blue diesels. The pristine sample models supplied by Rapido for review, as impressive as they were, clearly needed a bit of attention to allow them to blend in with their surroundings.
Initially, I intended to treat the BR blue van alone, as this version is more appropriate for most of my layouts. However, ‘in for a penny, in for a pound’, as they say, and treating a couple of models in a similar way usually adds little time to the overall project and also helps reduce any potential waste of excess paints and materials.
That said, it’s the treatment of the blue van that is the main focus of this demonstration, as the layered approach I adopted was tailored towards creating a slightly faded appearance to the paintwork, before the ‘grime’ coats were applied. The subtle shifts in tonality do not show up as clearly in the photographs, but in real life the difference from the original finish is discernible and helps reinforce the story of this vehicle’s working life, operating day and night throughout all weathers.
Working in stages demands patience, as each application of paint has to dry out completely before continuing. The use of oil and enamel paint prolongs things, with several days required for the solvents to evaporate completely. It’s possible to rush things, if you must, but there’s a good chance you’ll spoil the previous layer, as fresh paint softens the earlier coating, even if the surface feels dry.
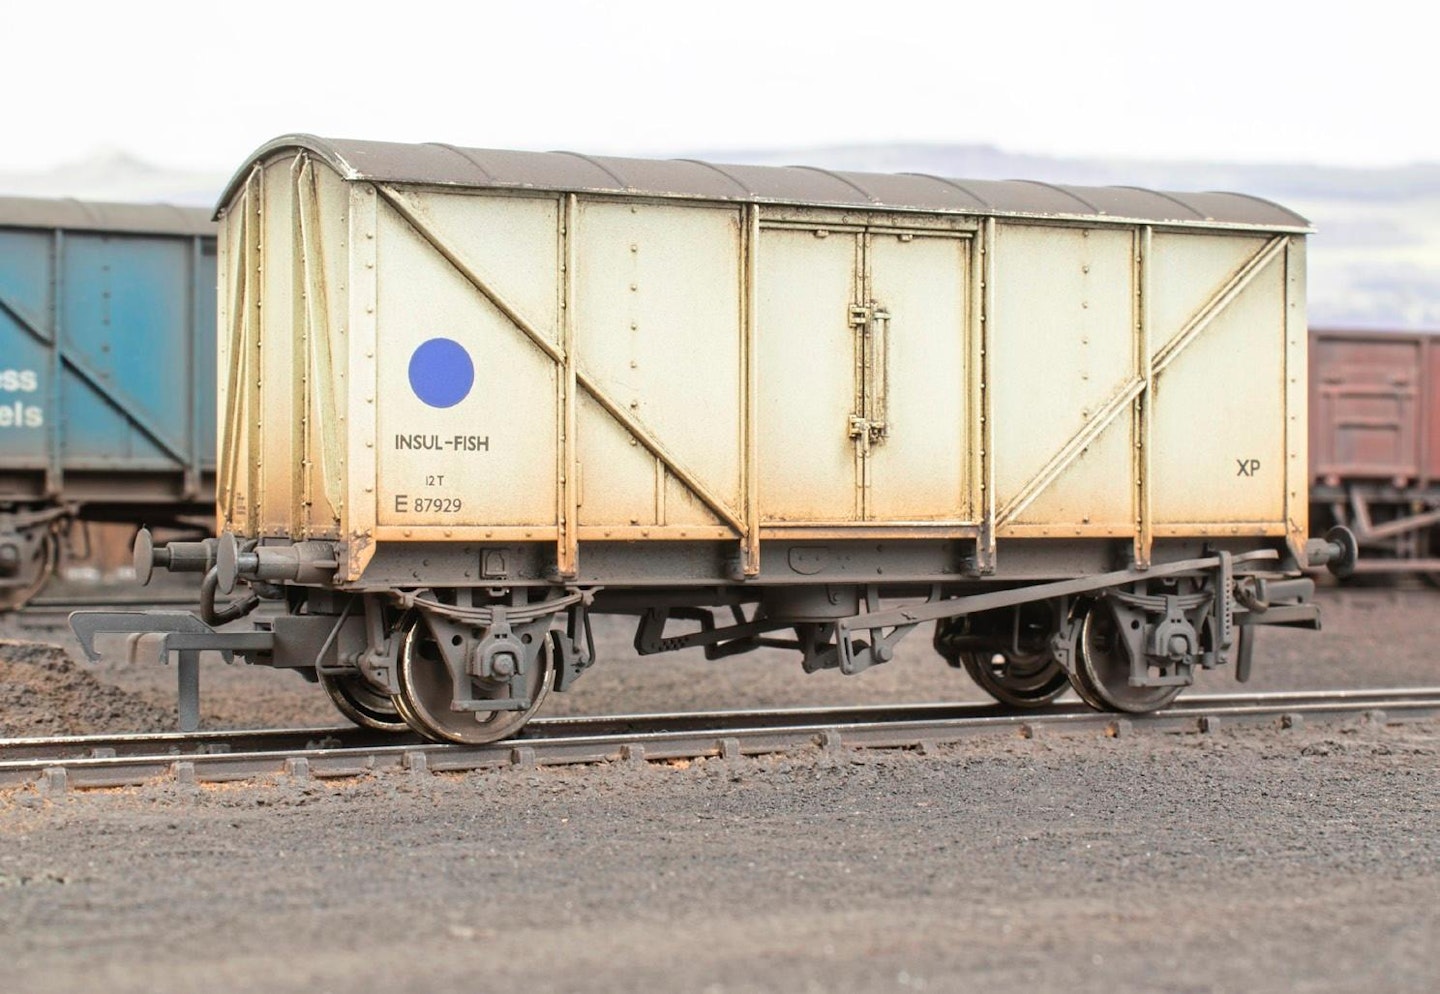
White freight wagons would not stay clean for long, especially in the era of steam and early diesel traction.
SEAL THE DEAL
Employing a sealing coat of clear varnish offers protection to the preliminary ‘fading’ stage, once the surface is fully dry, and is highly recommended. But that adds even more drying time, I’m afraid. Hence, these are the kinds of jobs I have on the go alongside other projects, as the work can be done in stages of about 30 minutes at a time, before the models are left for a few days.
The airbrush, although not essential, does add the final flourish, as there are few viable alternative means of creating such a finely misted coating of paint over a three-dimensional surface. I applied just two paint shades through the airbrush, using it to soften the harsh brush strokes left behind from adding the textured coating to the underframe and the streaks of weathering wash applied to the roof. Similarly, the airbrush gave the body sides and ends that distinctive, hazy coating of dust emanating from the rails (achieved with the brown Frame Dirt shade) and weather staining from above (using the darker blend of Weathered Black and Frame Dirt).
A look at images of the real thing – or contemporary equivalents – is a great source of inspiration, noting the different textures and tones that tend to build up on underframe surfaces, bodywork and roofs. And it’s worth pointing out that all of the stages employed here are reversible up to a point. The use of slow-drying oil- and enamel-based paints not only gives you more time to manipulate the effects, but also allows them to be wiped clean with the aid of suitable thinners before the paint hardens completely. Only the aforementioned clear varnish coats, applied via aerosol, provide finality, as these can be murder to remove without making a mess.
As ever, practice breeds familiarity, which begets confidence, so trialling these techniques on older models is a great way of learning and experimenting. There’s no single ‘right way’ of doing this kind of thing – if the finished model looks good to you, then you’ve succeeded. But maybe you’ll find slightly different methods that suit you better. All power to your elbow!
KEEP ‘EM CLEAN
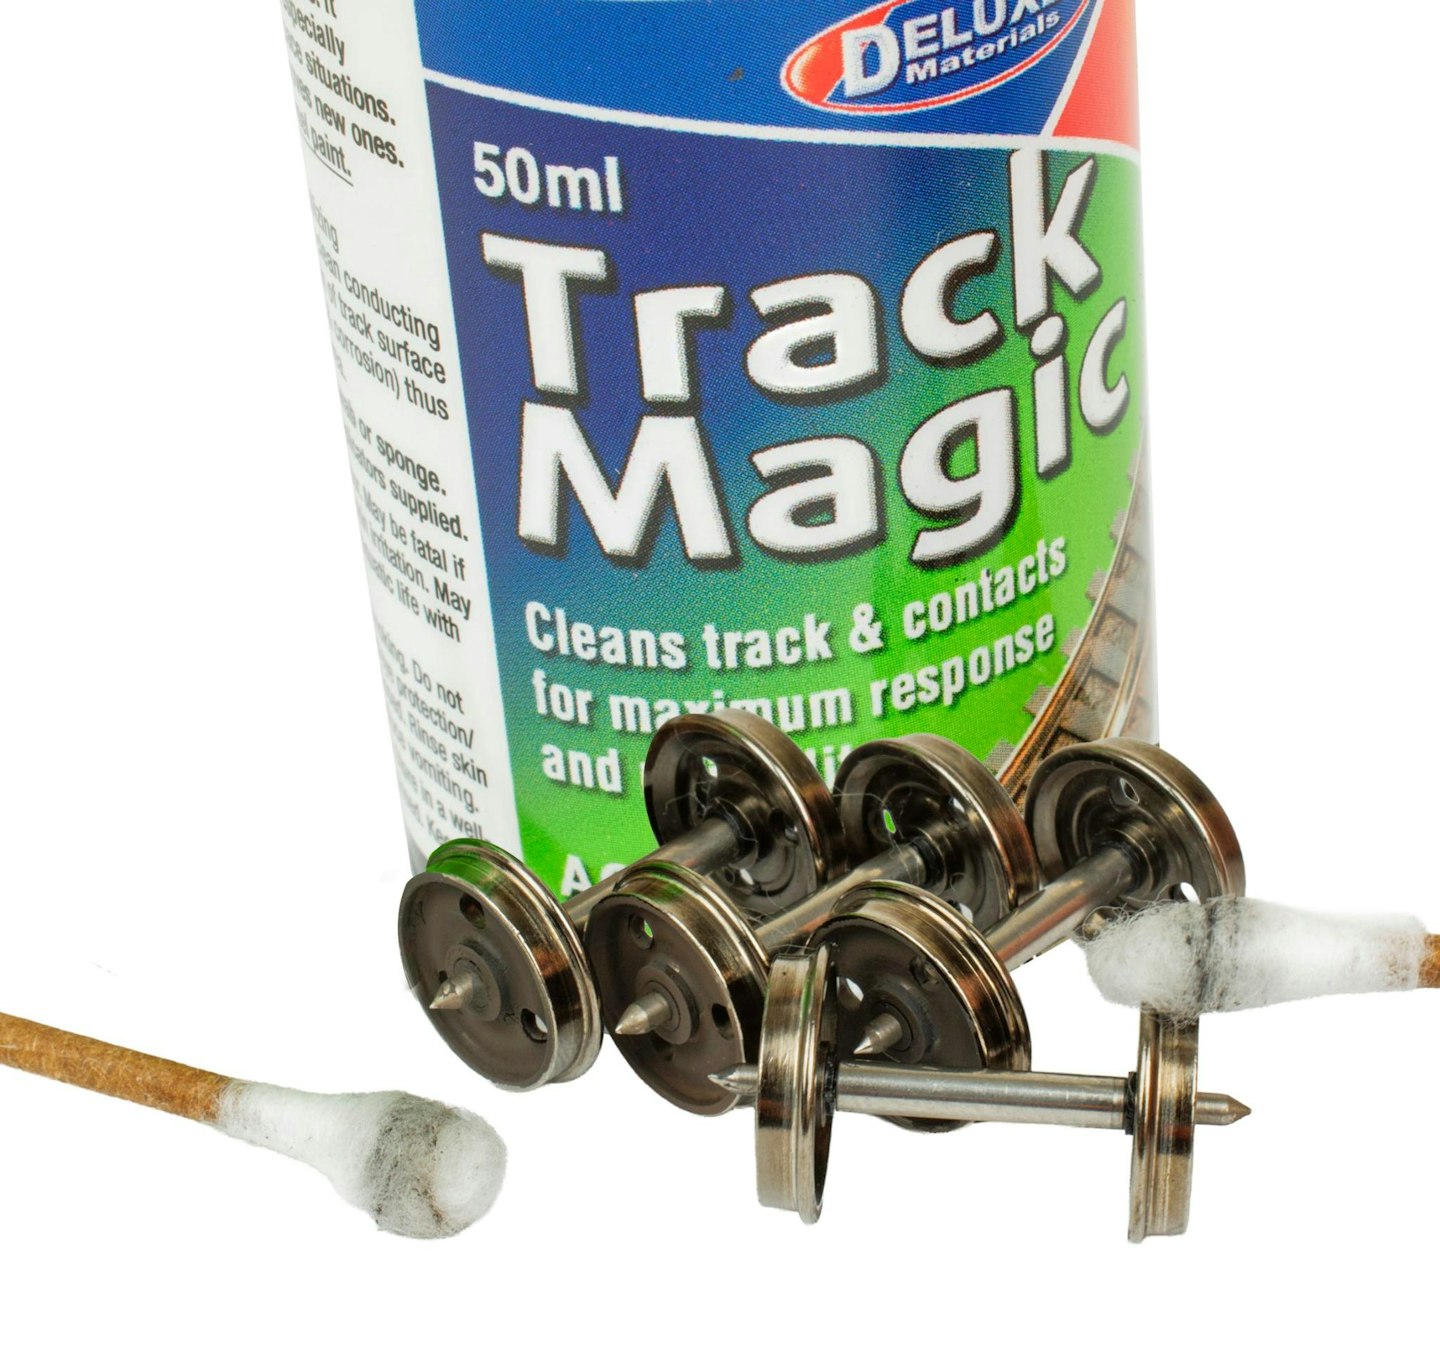
The wheels of your humble freight stock may not be required to collect power from the rails, unless you’re powering working tail lamps or suchlike, but it’s vital to keep them clean, especially after a weathering job. Remnants of paint, thinners, dry pigments or oil and grease, unless cleaned away, will simply be deposited on your track as the wagons move around, leading to dirty rails and poor locomotive performance.
With an effective cleaning fluid, such as Deluxe Materials’ Track Magic, it takes a couple of seconds to clean each wheel tread and flange using a cotton swab. You may be amazed to see just how much dirt you remove from each wheel! Repeat the process of dipping the swab in the fluid and wiping it over the wheel until the cotton fibres remain clean, then move on to the next wheel.
It’s also good to wipe the tips of pinpoint axles too, to keep any dirt or debris out of the bearings.
STEP BY STEP
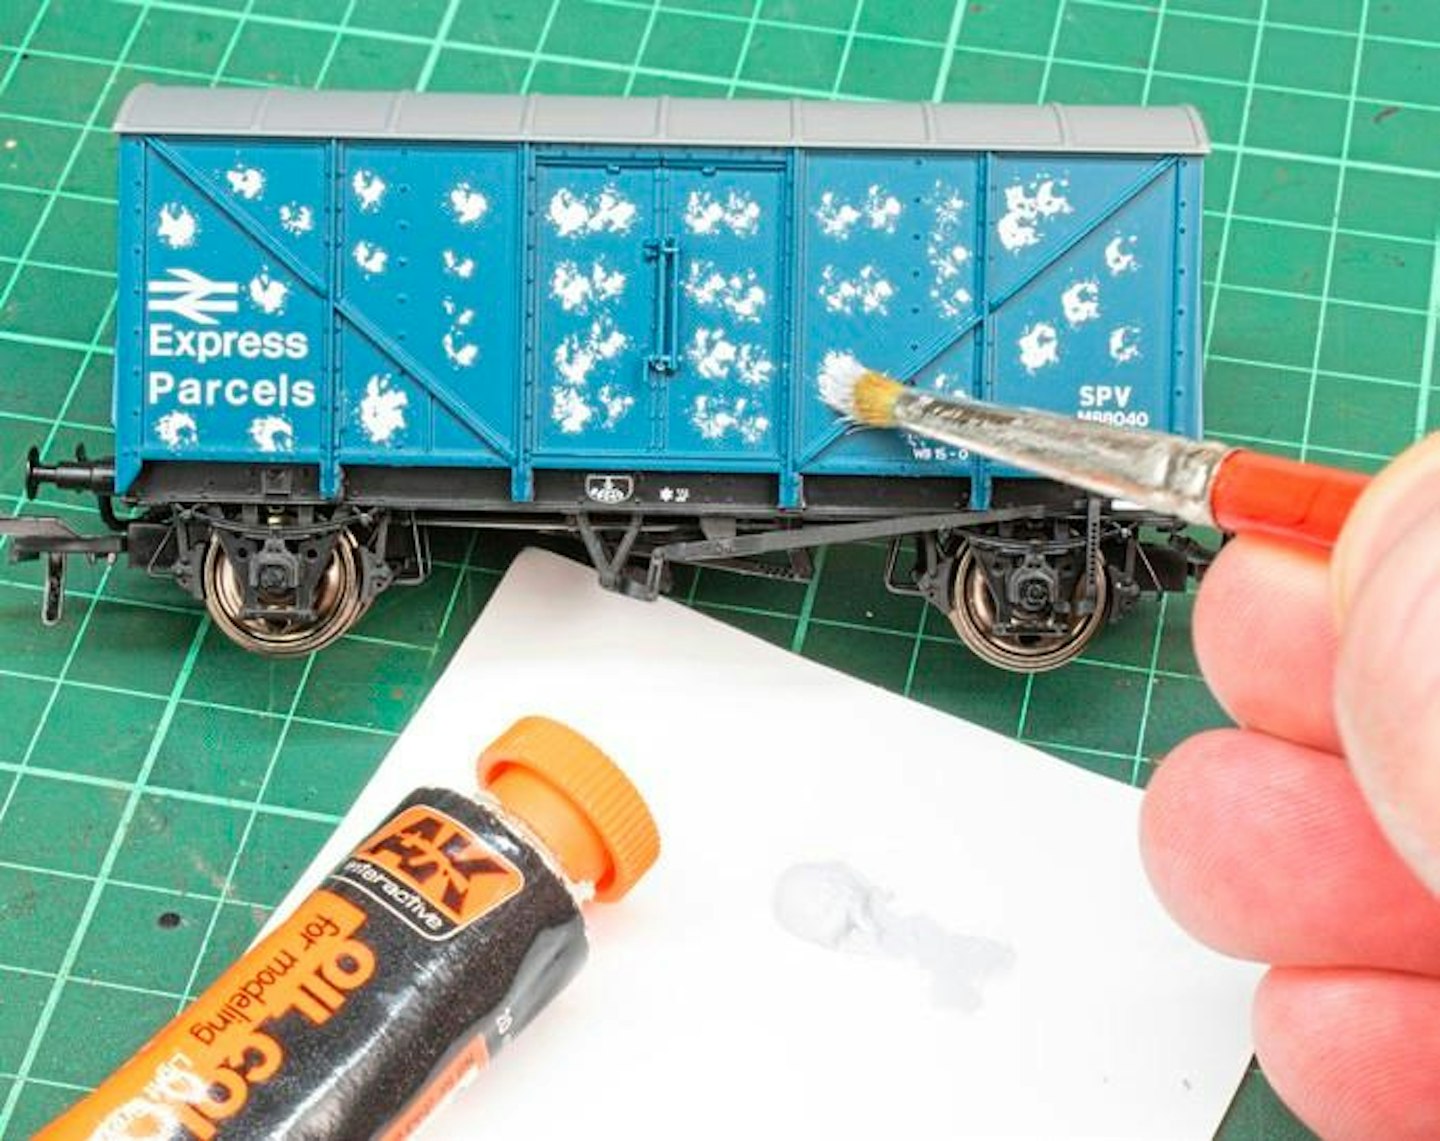
1 Tube-based oil paints are great for weathering. They dry slowly and are easily manipulated, or removed with a matching thinner. Here, I’m applying small spots of grey to each panel, where the paintwork is likely to appear lighter.
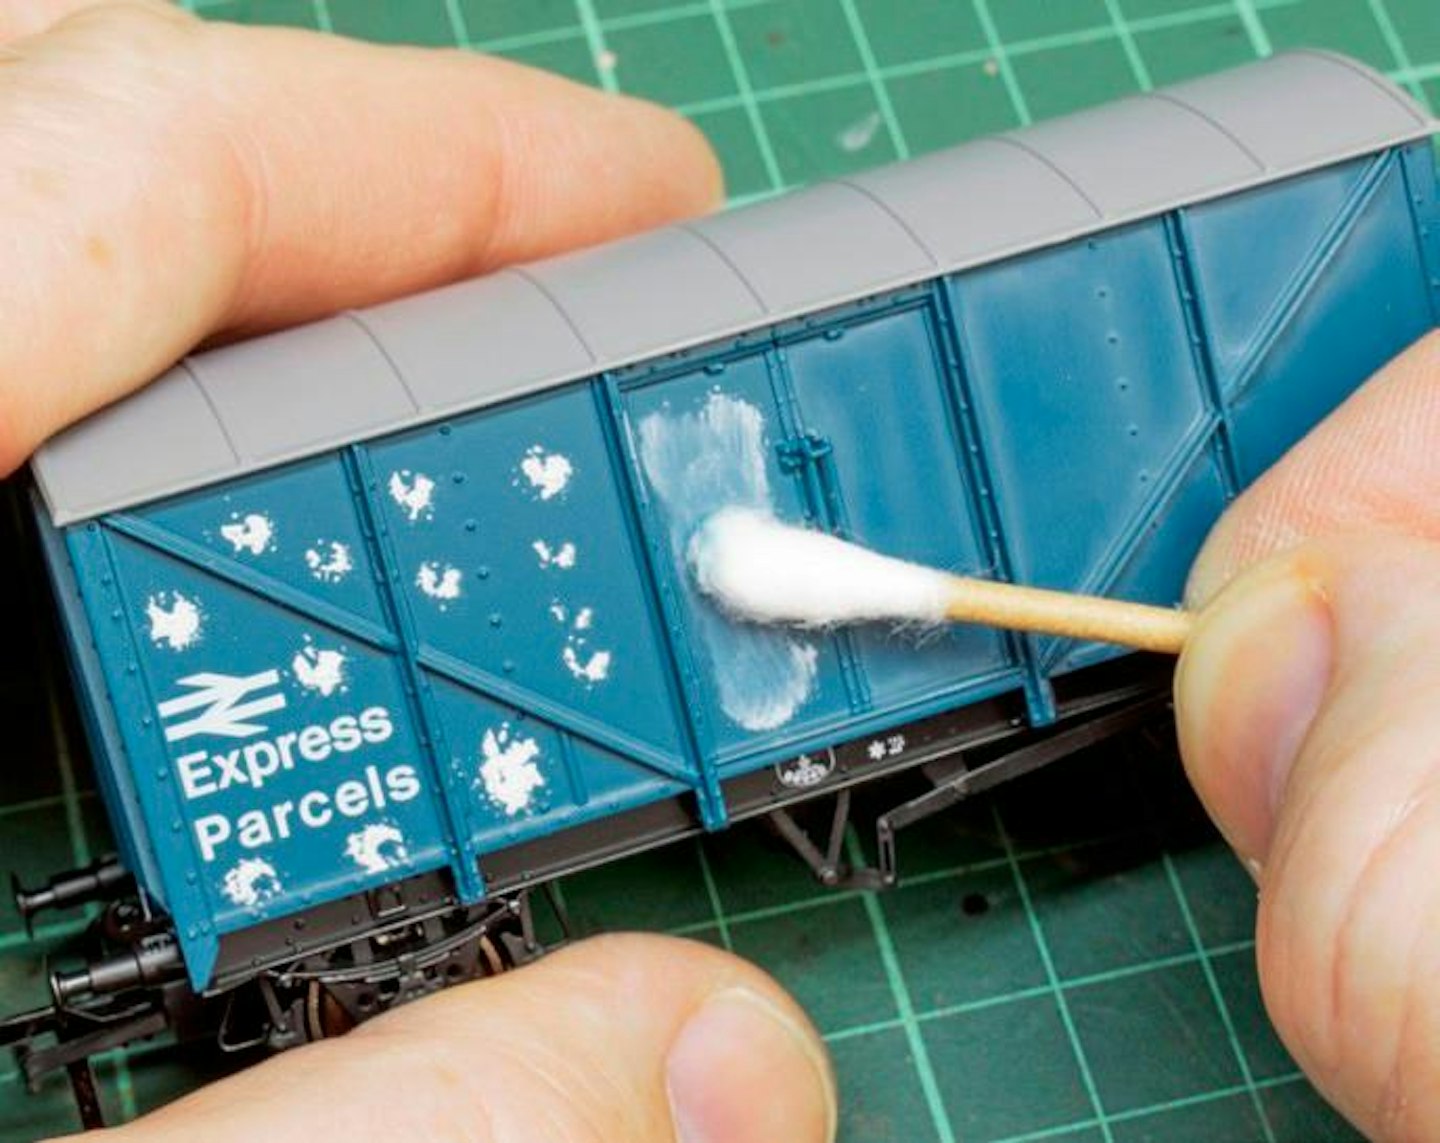
2 With cotton swabs, I wiped the grey oil paint over the sides in vertical strokes, until a feint hue remained. I didn’t need thinners, but I change the swabs regularly. Use vertical strokes to emulate natural streaking effects.
3 It took a while to work around both sides and ends, taking care not to leave fingerprints on the surface. Remove as much of the oil paint as you desire, until the fading effect is pleasing. Then leave the model to dry for a few days.
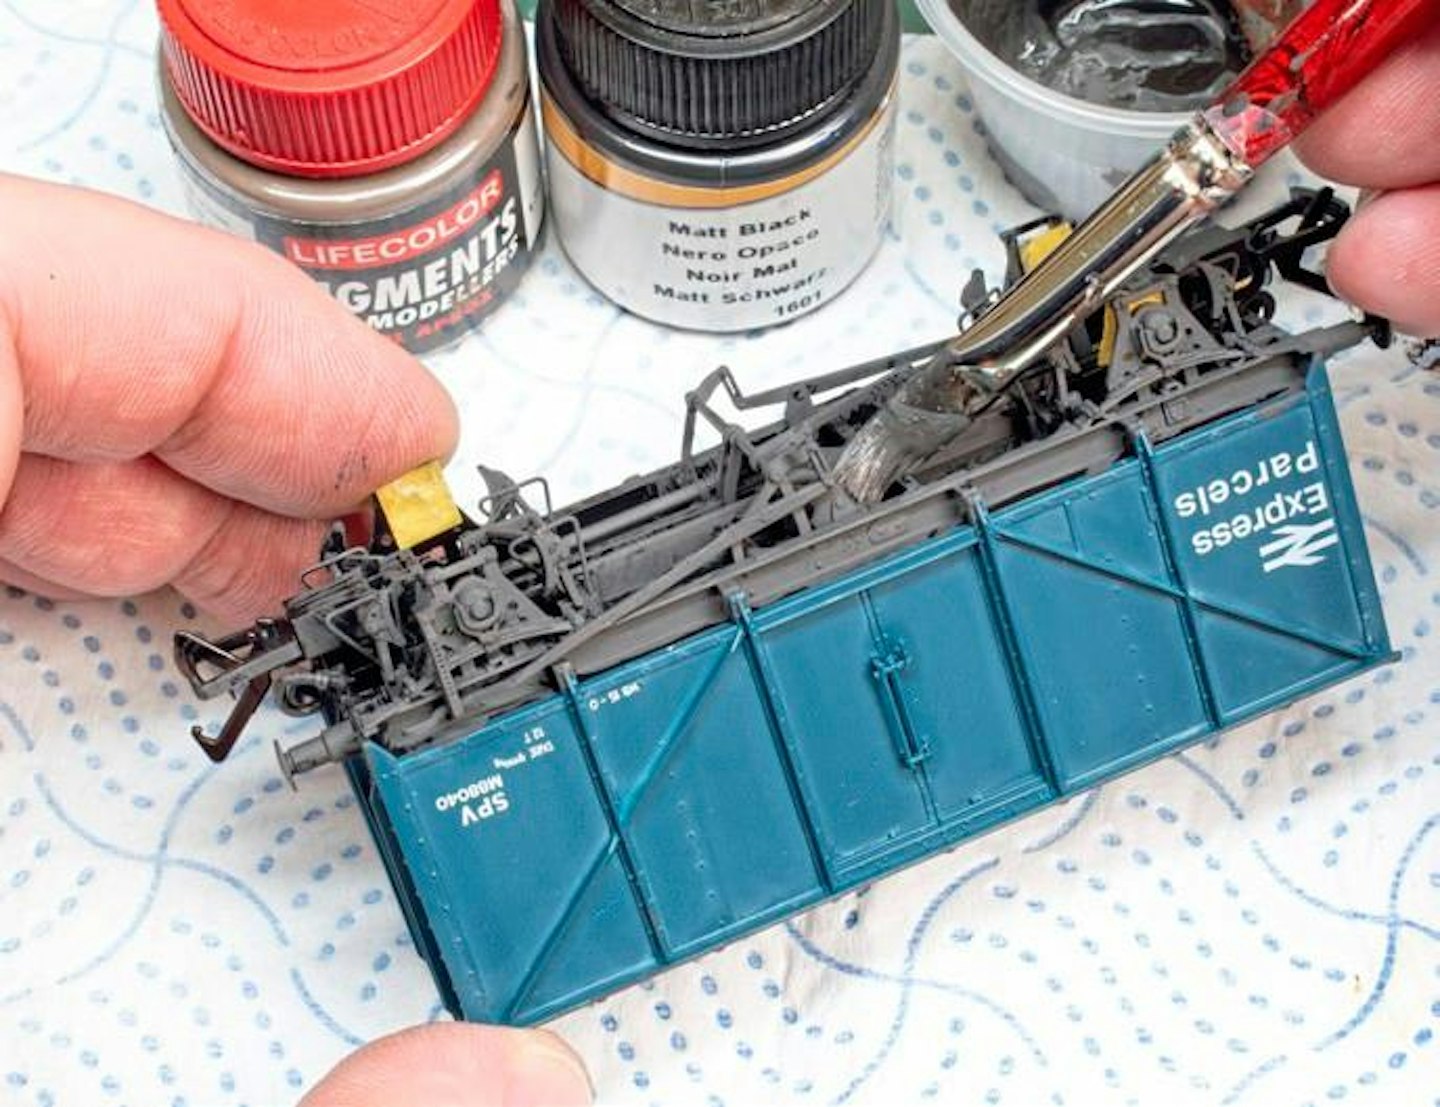
4 To preserve the fading effect I gave the model a light coat of semi-gloss clear varnish. When this had cured, I blended matt black acrylic with dark brown pigment to create a textured coating, which was brushed onto the chassis.
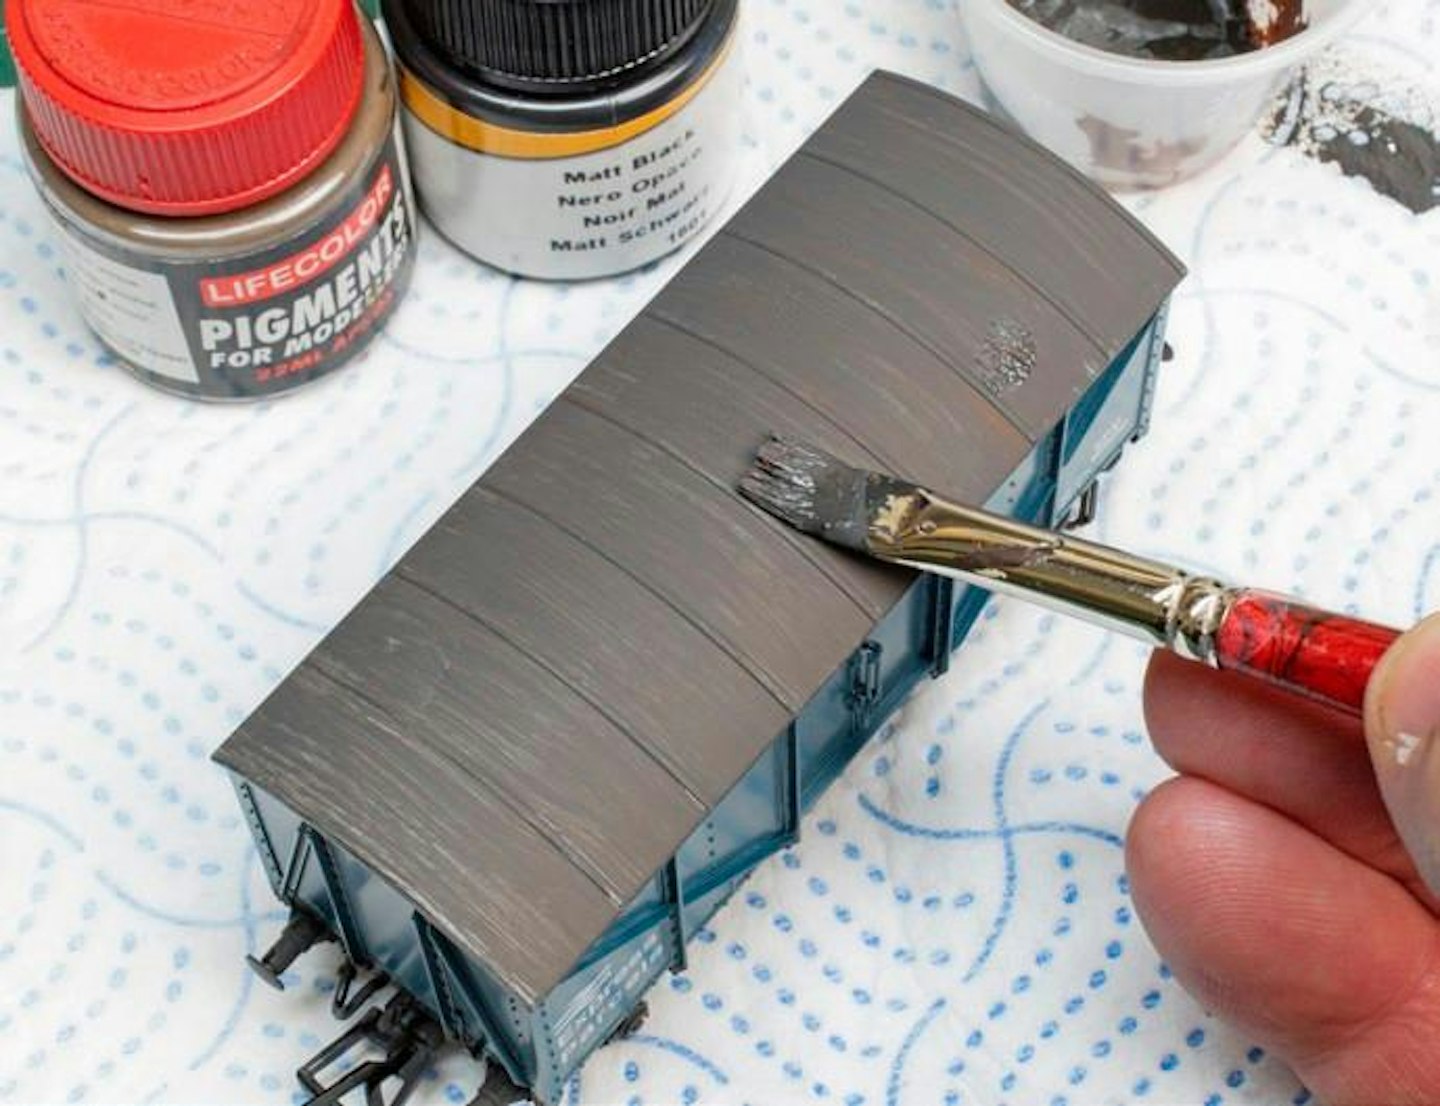
5 The textured paint mix was also brushed over the roof, using lateral strokes. When dry, this blend will have an ultra-matt sheen, with the texture resembling years of dust and grime.

6 A dark brown enamel wash (exact shade isn’t important) was brushed over the bodywork, working the pigment into recesses and allowing it to settle naturally. It helps to work on one side at a time, with the model laid flat.
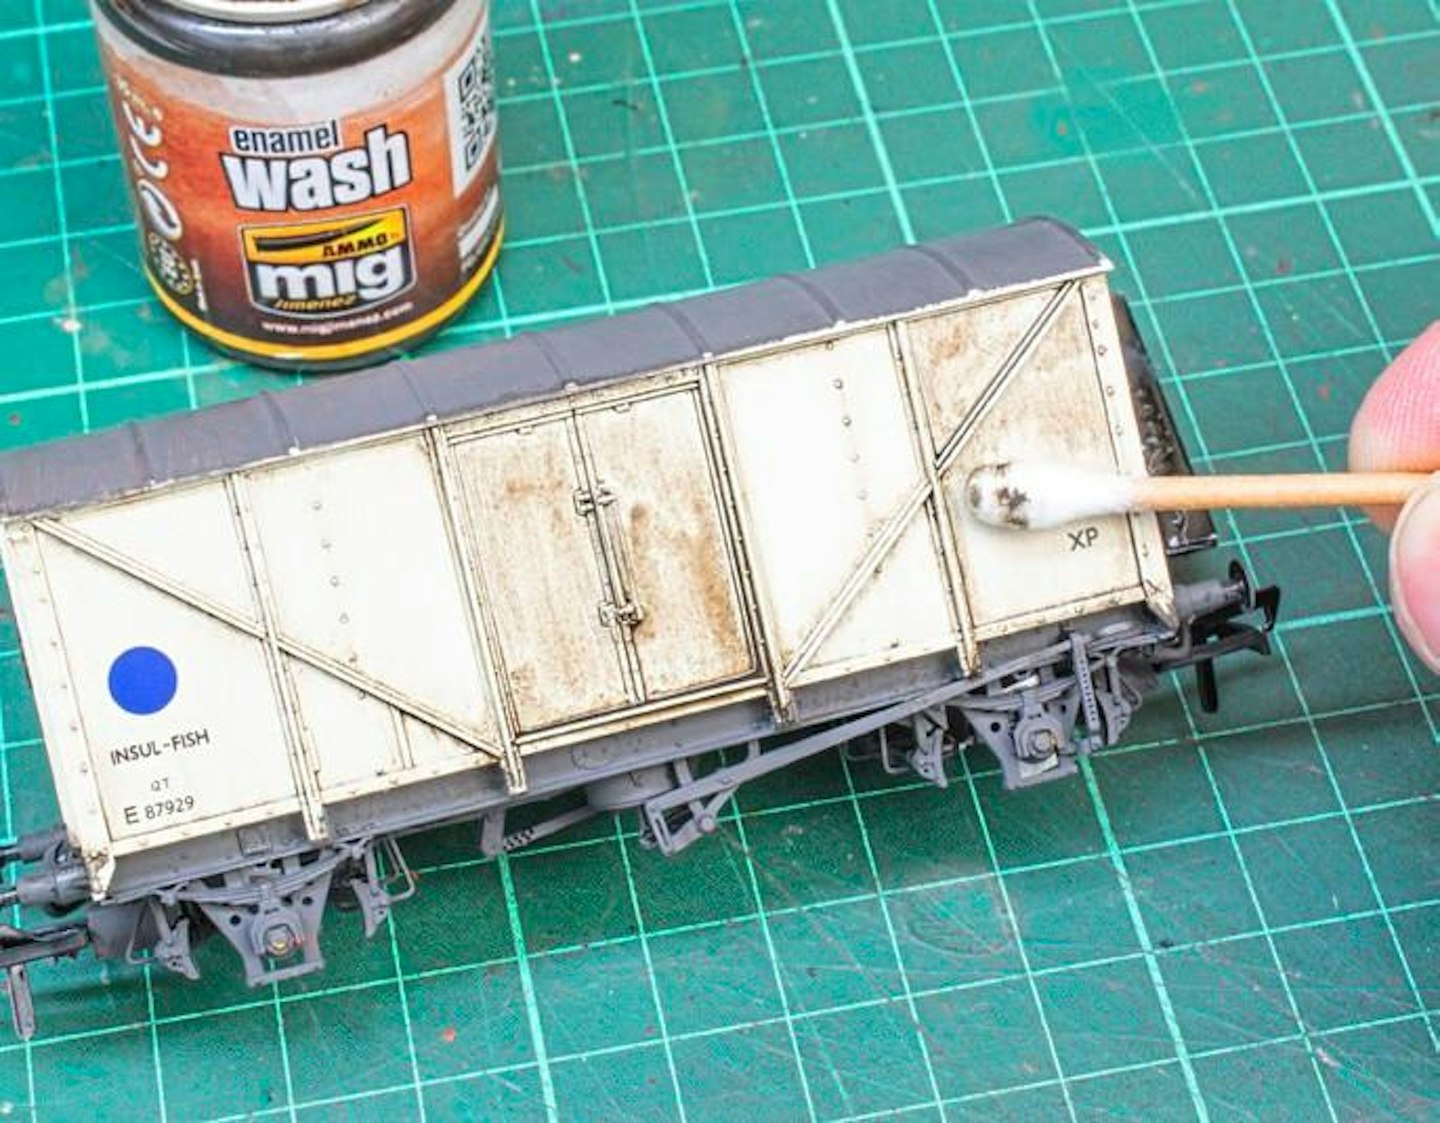
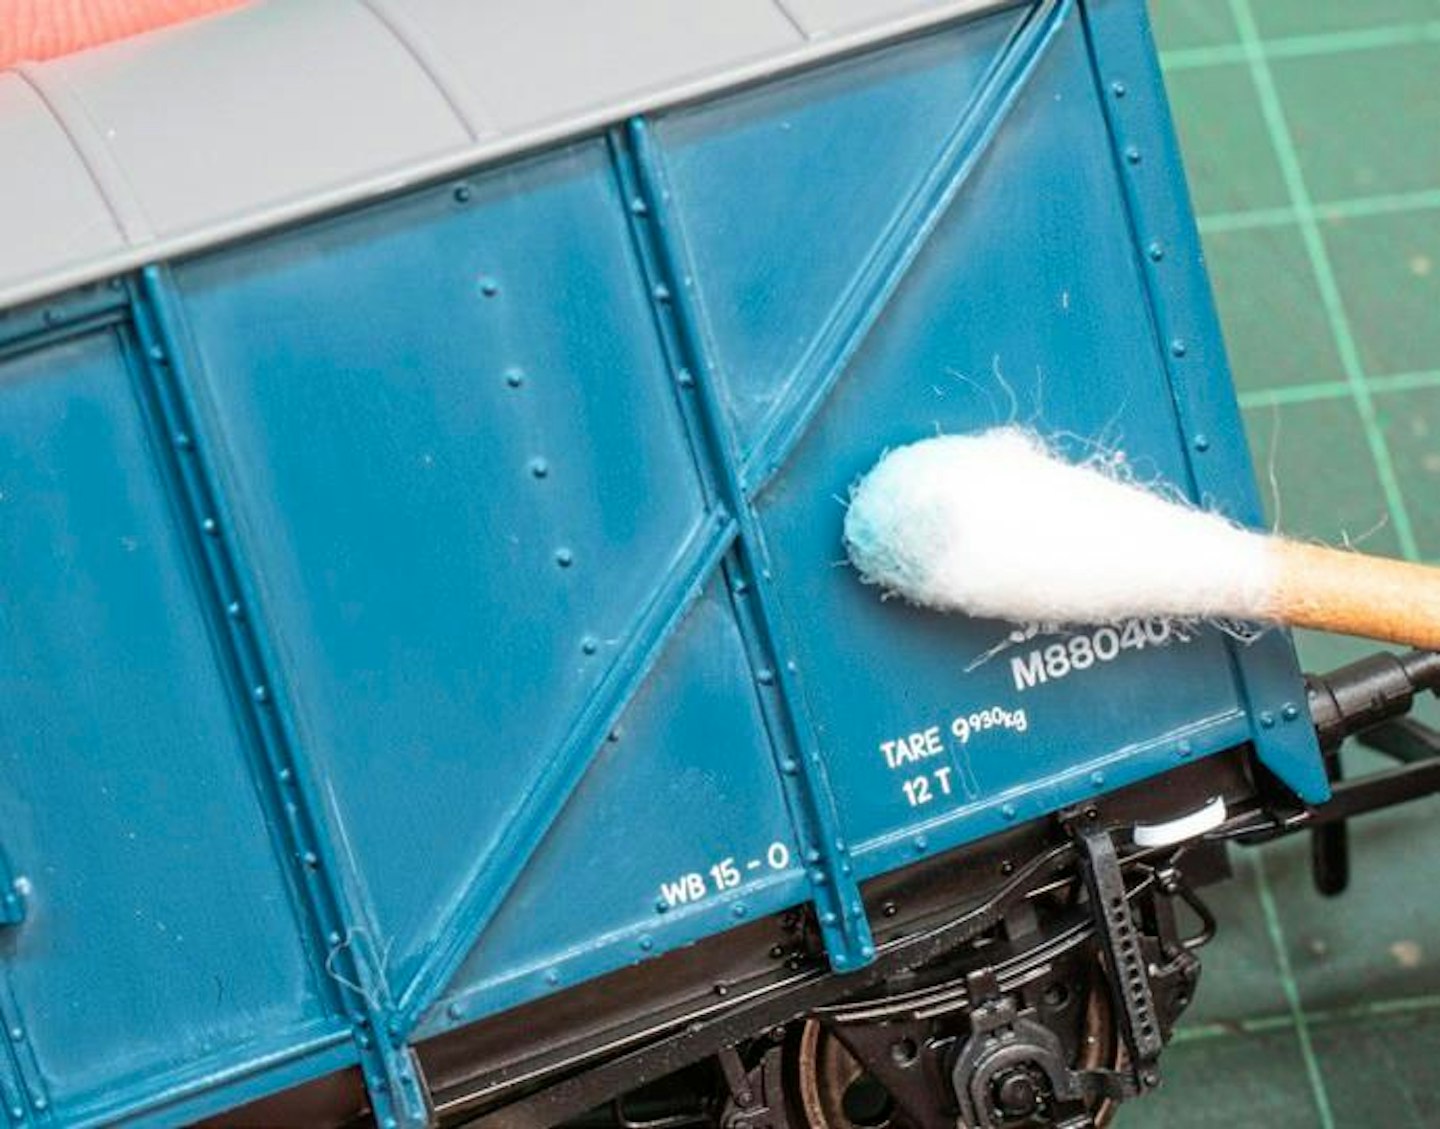
7 The wash was allowed to dry until it turned to a matt sheen. Then, I wiped away the bulk of the wash with swabs, working in vertical strokes and leaving pigment around the ribs and rivet detail, as well as recessed panel lines.
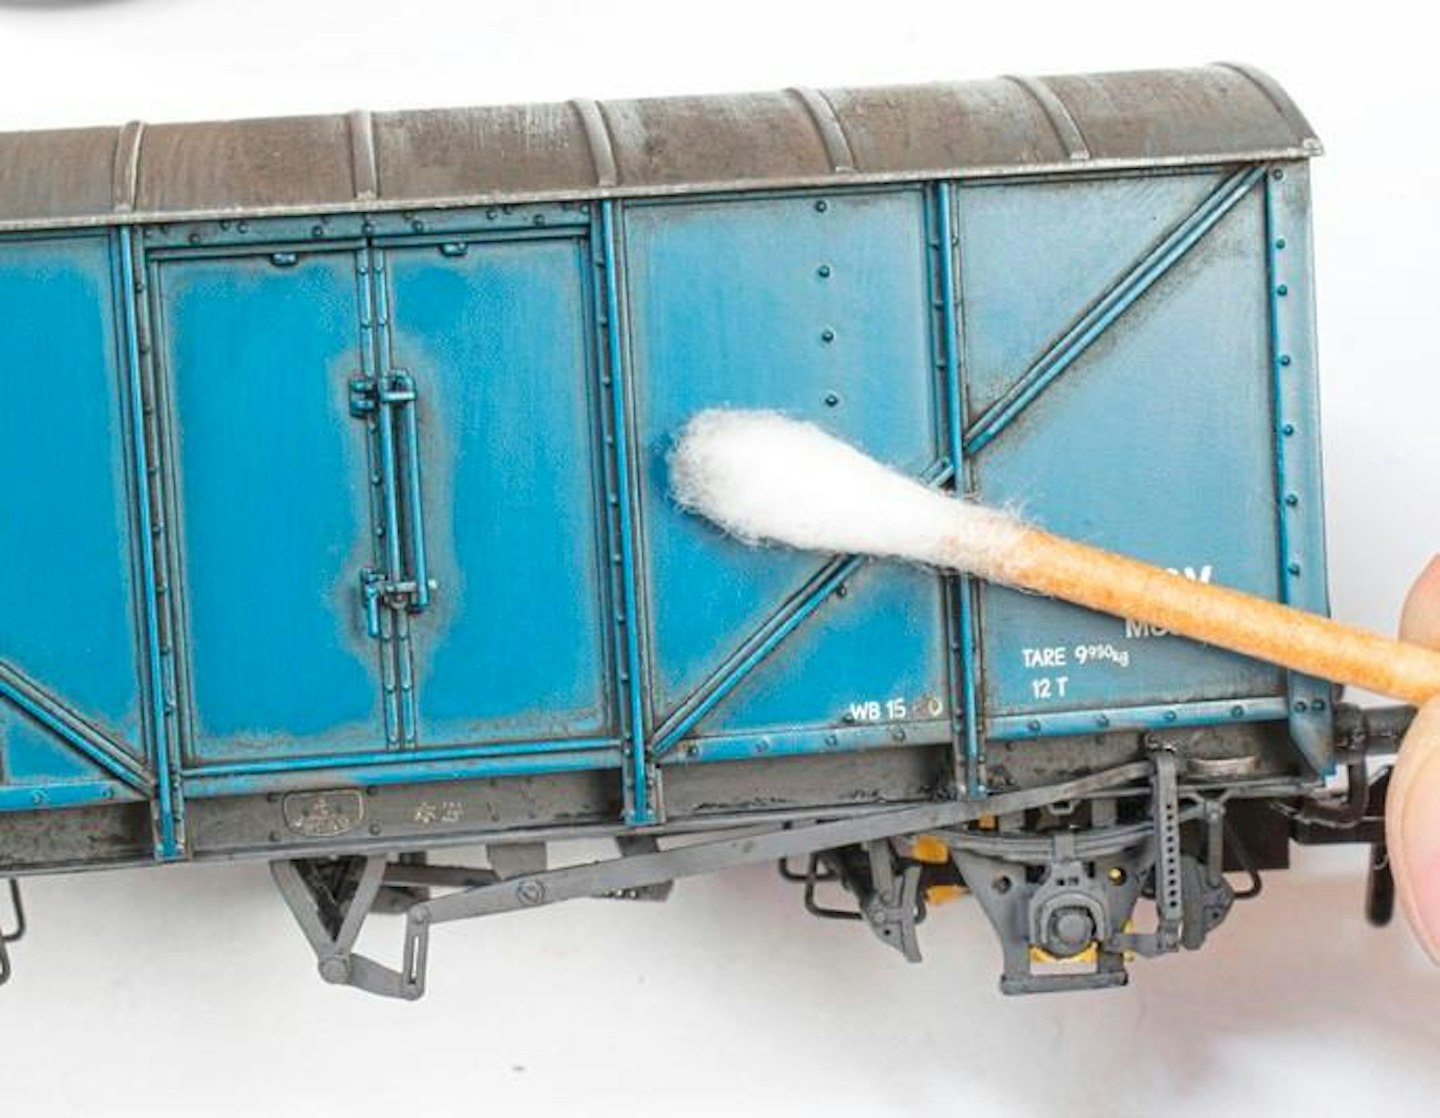
8 This stage demands patience, but there’s no need to rush, as the wash remains workable for an hour or so without the need for thinner. Remove as much of the pigment as you like, until the surface looks right to you.
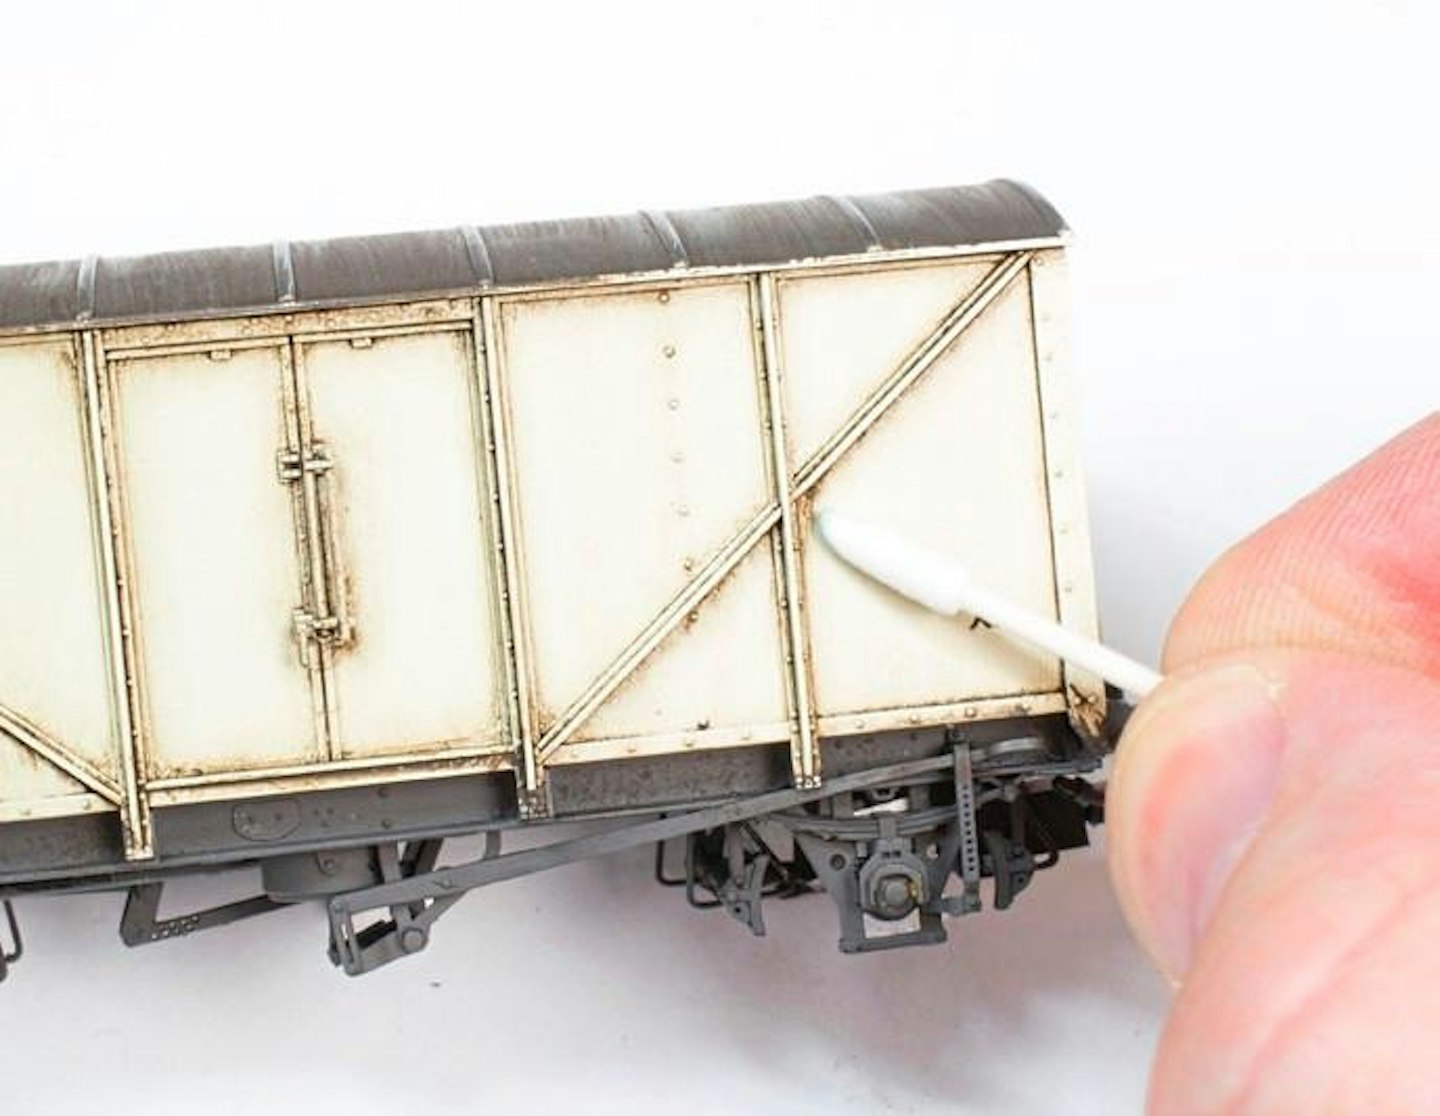
9 Regular cosmetic cotton swabs were used for most of the work, but pointed buds will be useful to reach into tighter spots. You can get them from cosmetics counters or model shops, but they’re a bit more expensive.
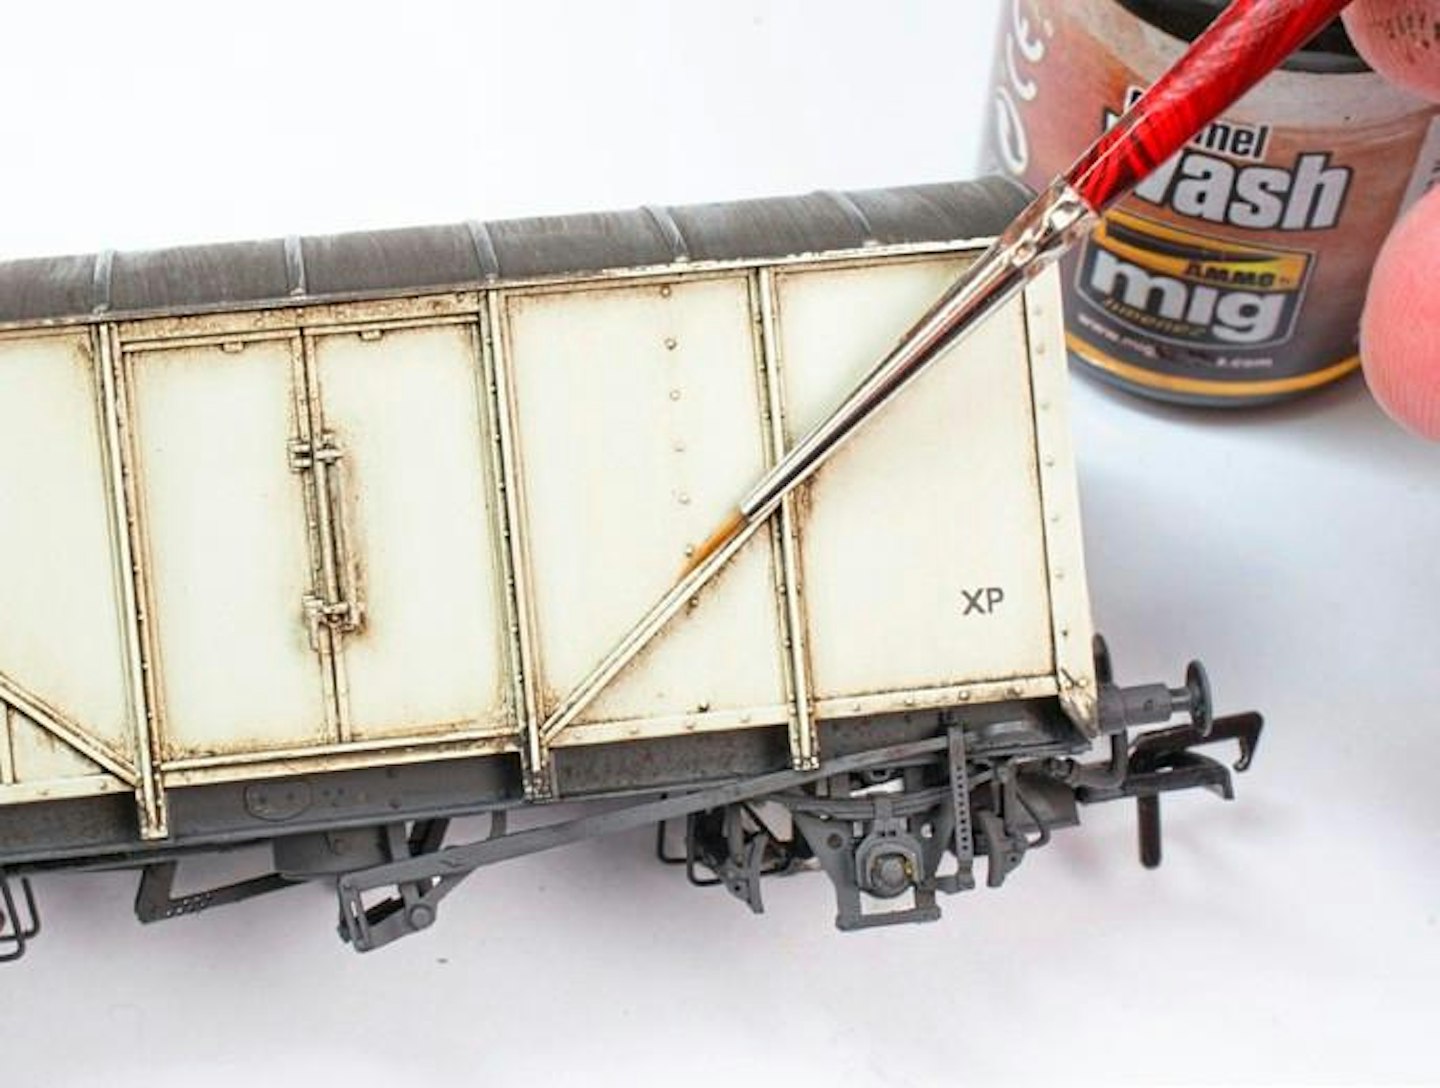
10 In the event of too much wash pigment being removed – as was the case on the parts of the white van – a fine brush can be used to run more of the wash into any recesses or along the edges of raised features.

11 The enamel wash was applied to the roof with a wide flat, soft-bristled brush, working from side-to-side to mimic streaking effects brought on by rain running off the roof. Allow the model to dry for at least 24 hours before continuing.

12 Final weathering work was done with an airbrush, initially loaded with thinned RailMatch Frame Dirt enamel. The paint was misted very lightly around the chassis detail, softening the appearance of the earlier textured coating.
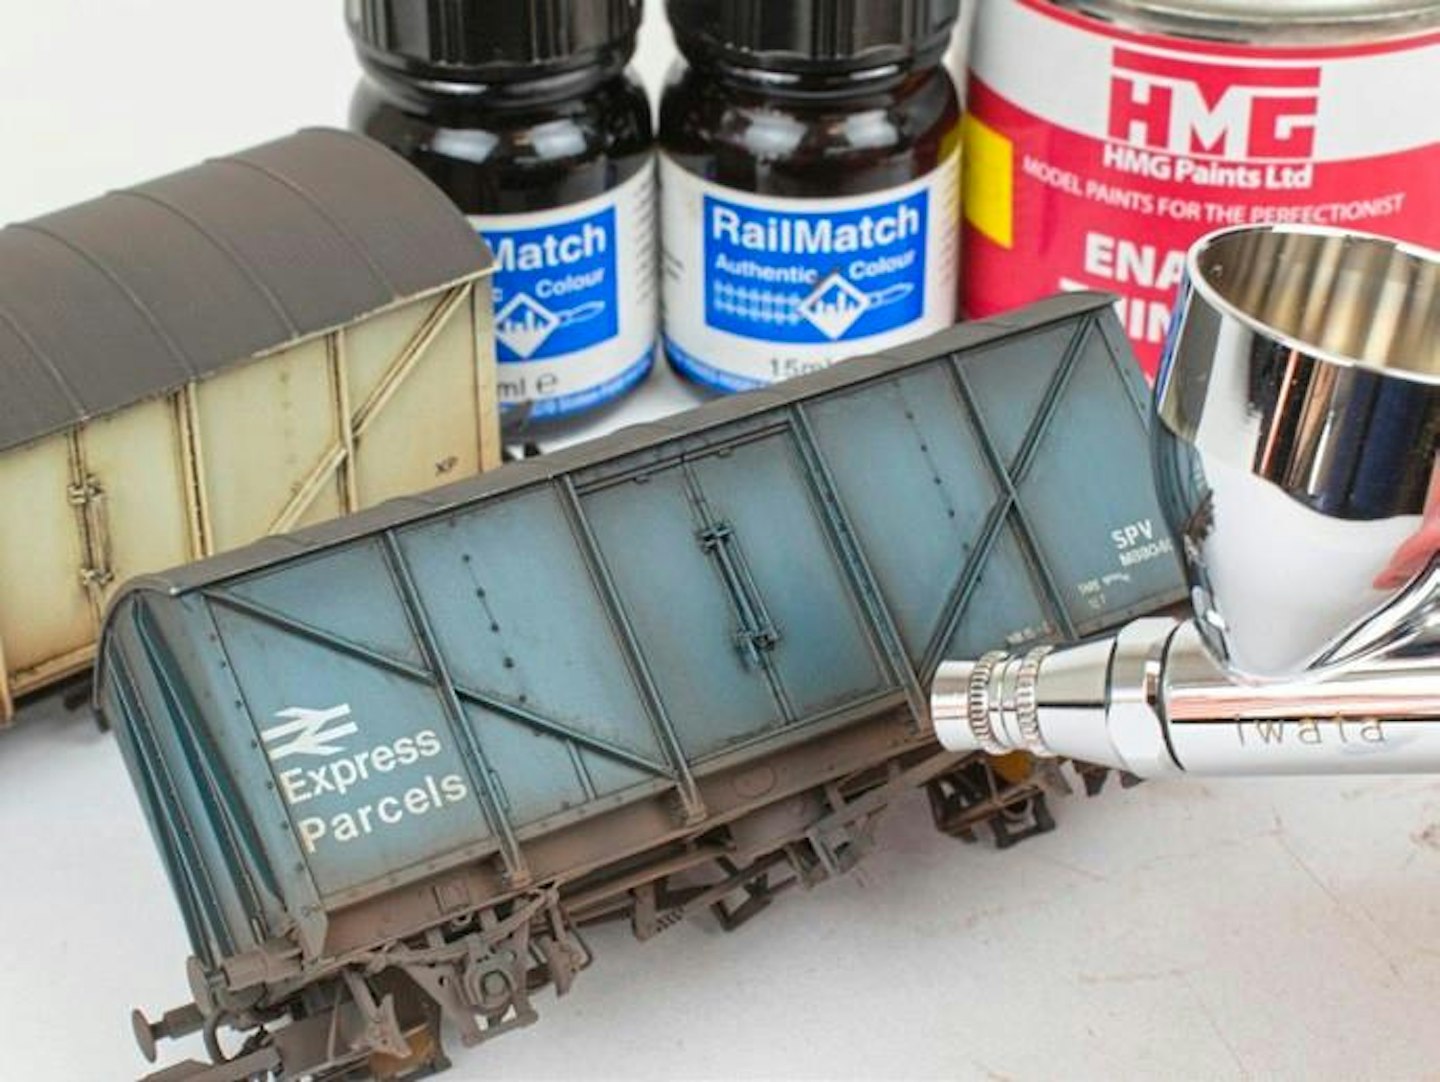
13 Once the underframe was treated, the same dirty brown paint was misted along the side frames and lower edges of the bodysides and ends. Just a fine mist is required. Practise your control of the misted paint on scraps of paper.
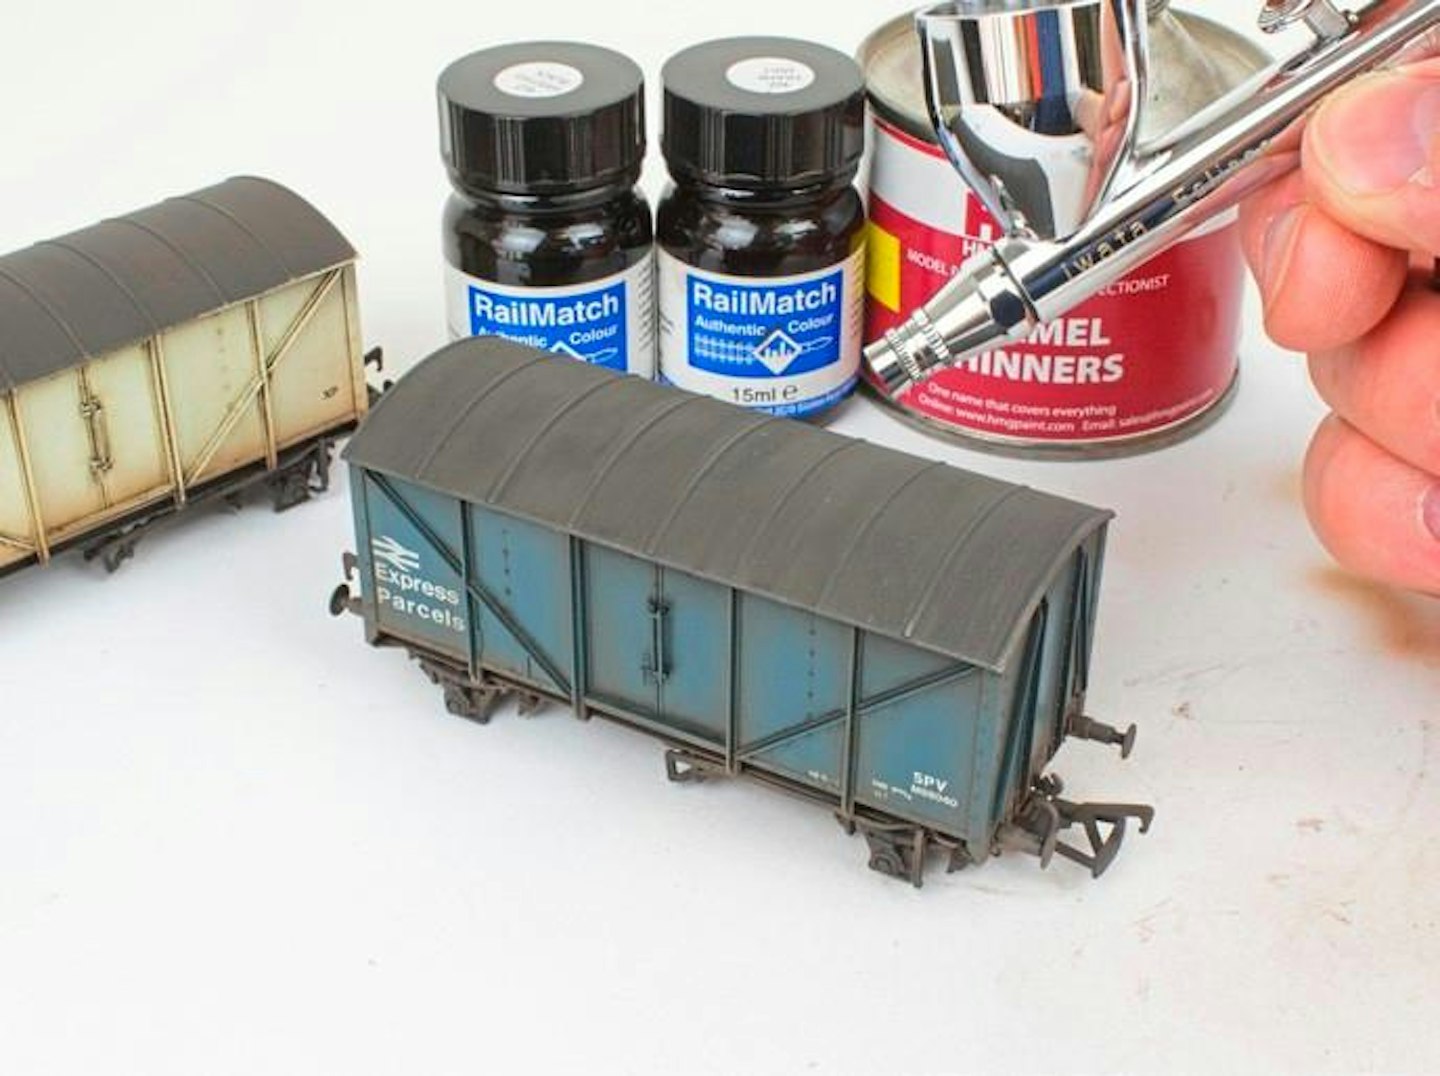
14 Moving to a darker shade, blending some Weathered Black into the Frame Dirt and adding a more thinner, the new spray gently mistied over the roof, in a side-to-side pattern. I also targeted this along the upper sides.
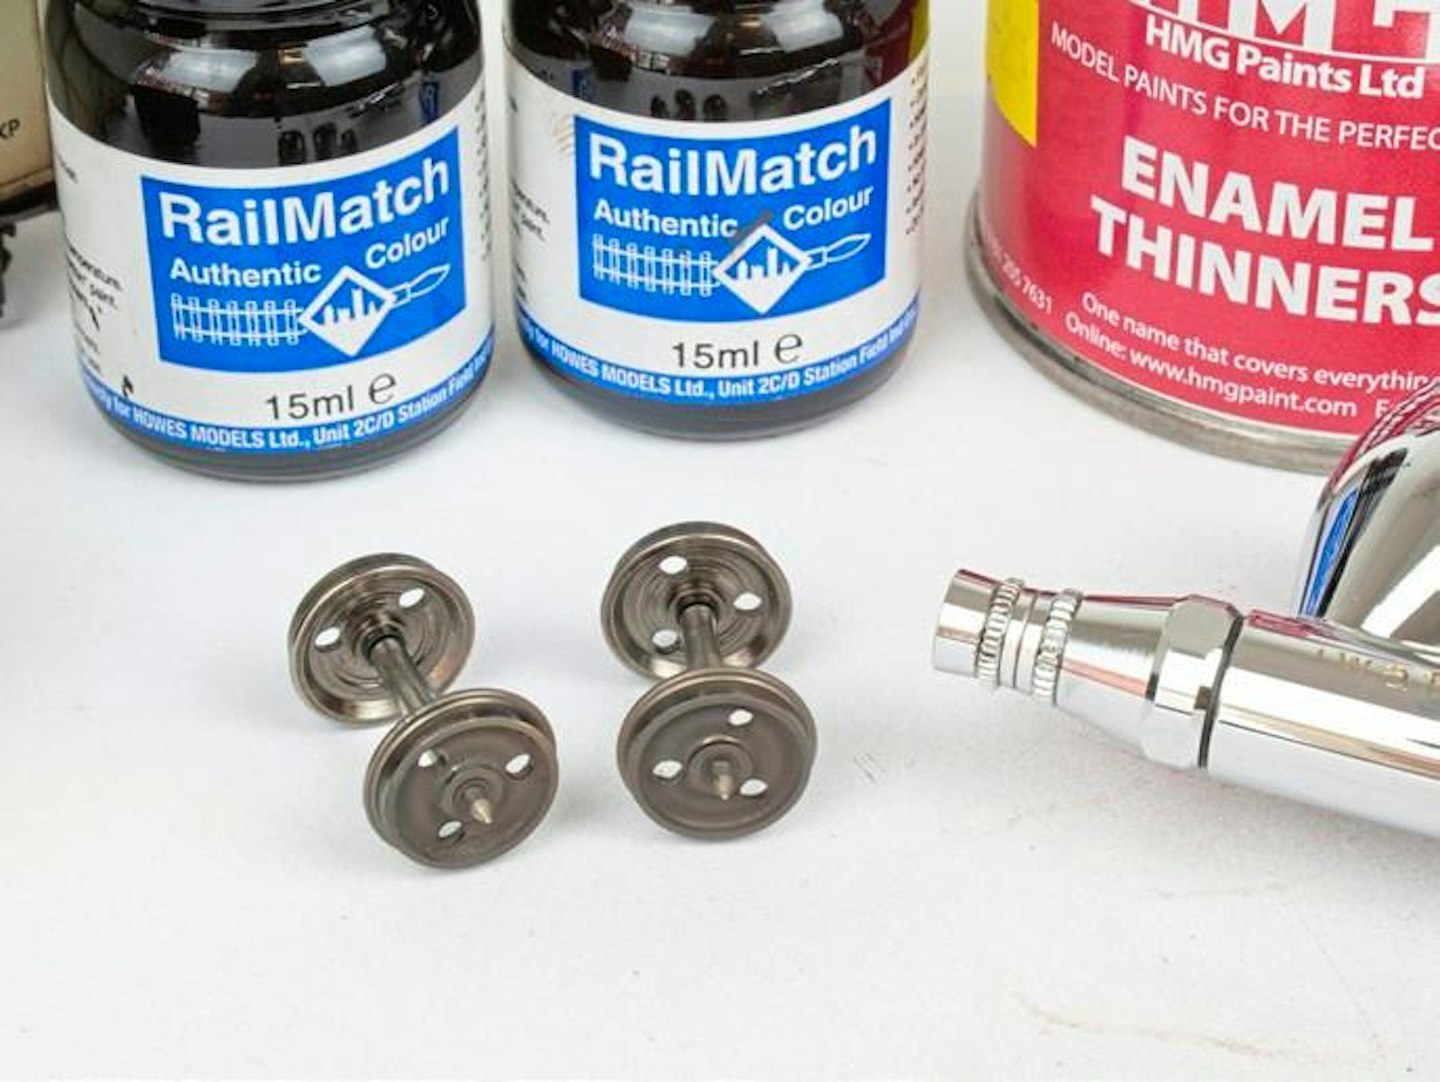
15 Finally, give the faces of the wheels a misting of paint to remove the coarseness of the textured acrylic. Allow everything to dry overnight then clean the wheel rims (see panel) and reassemble the models.