Workbench
A common hindrance to modern infrastructure programmes is the need to preserve historic remains uncovered during excavation works. Peter Marriott imagines a surprise find that may add further delays to the building of HS2!
 PHOTOGRAPHY: PETER MARRIOTT

The various trials and tribulations of Britain’s high speed rail link between London and Birmingham – HS2 – are well known. But putting aside all the political and environmental arguments, the richness of the archaeological finds along the route has been fascinating.
The HS2 project has employed its own dedicated archaeological team, whose role has been to document and preserve the artefacts uncovered during excavation works. And what has been uncovered has certainly been diverse, ranging from traces of Neolithic monuments, Roman artefacts and infrastructure, rare forms of Iron Age coinage, foundations of early medieval churches and burial grounds, and even the still intact remains of the world’s oldest steam roundhouse, which were found at Curzon Street in Birmingham. The archaeology section of the official HS2 website is well worth a look (www.hs2.org.uk/building-hs2/archaeology/).
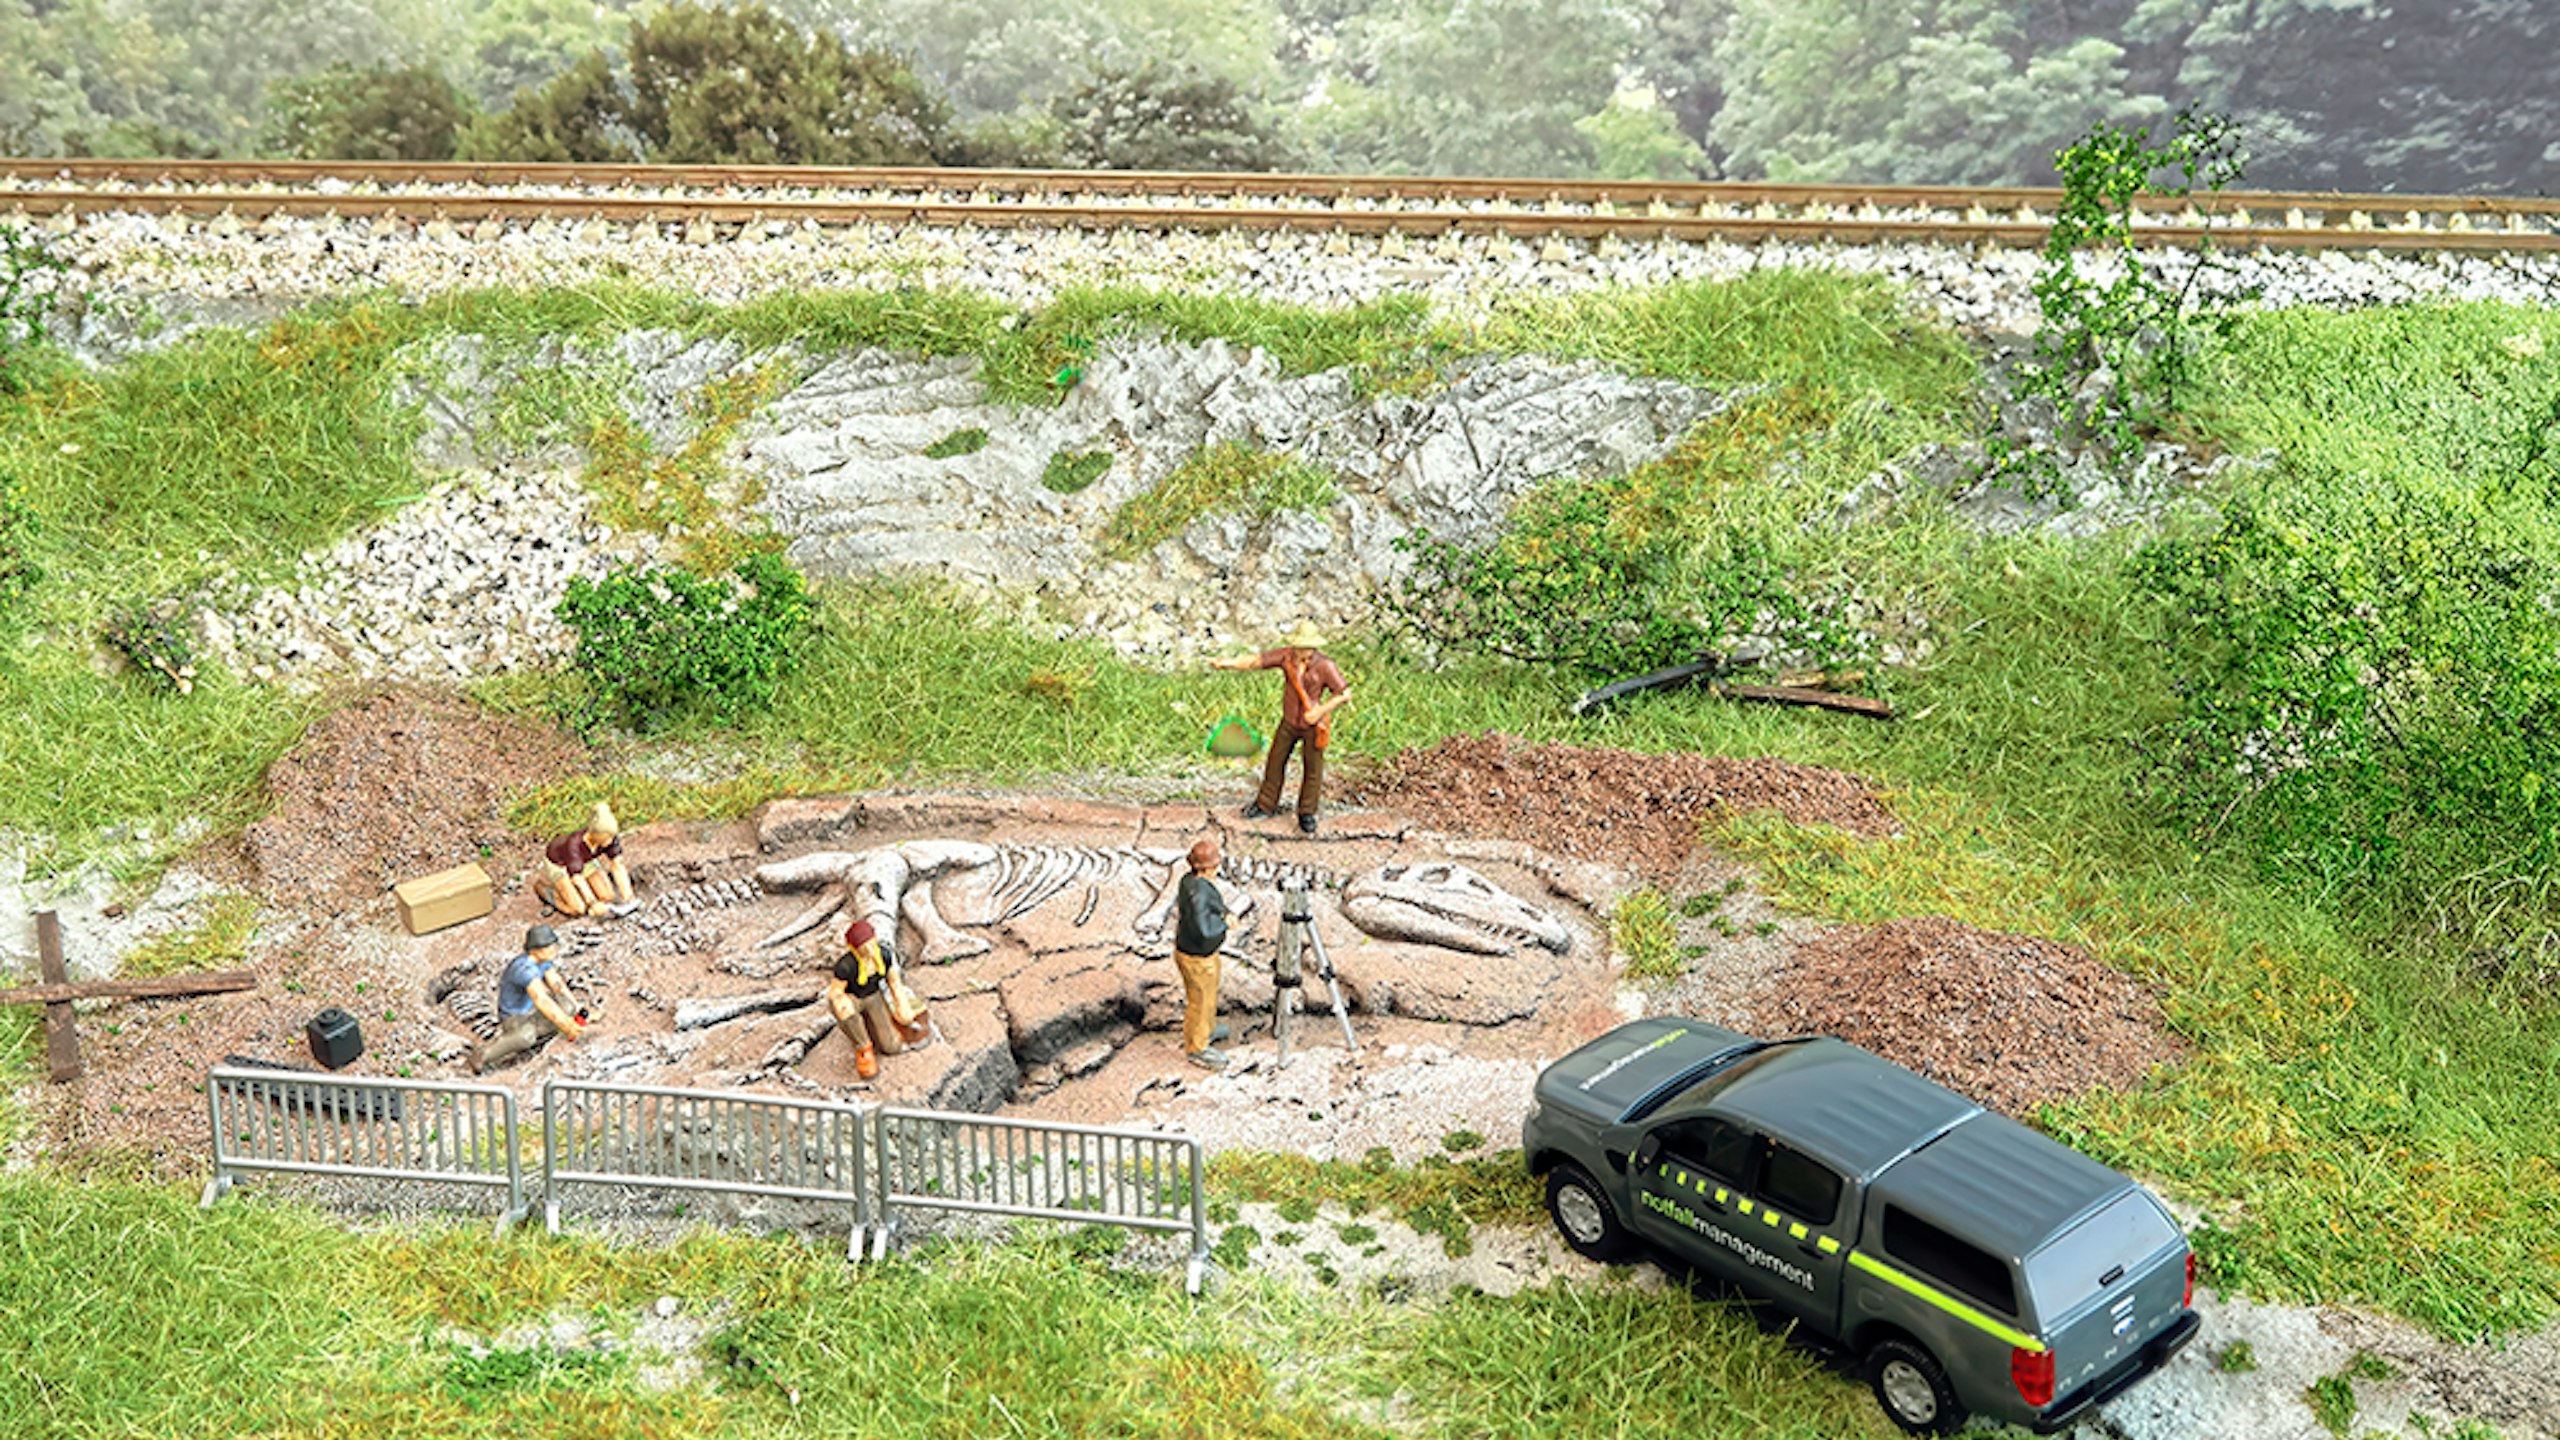
 The Noch set portrays the remains of a very dead Tyrannosaurus.
While modelling HS2 in an operational state seems premature, given that we don’t know what the trains will look like yet, the construction sites would make for an interesting addition to a contemporary layout. Given the route criss-crosses existing railway lines, it’s certainly viable. But instead of simply modelling earthworks and incomplete concrete structures, how about portraying the preliminary sitework of engineers and, especially, HS2’s archaeologists?
The idea for such an approach came with the release of some of Noch’s recent scenic cameo sets, depicting recently uncovered dinosaur remains. Rendered in hard foam and pre-painted, it’s ideal for dropping into a scene. If the dinosaur theme doesn’t appeal, then the Roman thermal bath excavation set may be more appropriate, especially if your layout is set somewhere with a strong Roman link, such as Bath, York or Chester.
 Noch’s pack of archaeologist figures are the ideal complement.
Measuring around 135mm long by 68mm wide, both excavation scenes are perfect for 4mm scale layouts, and can be complemented by Noch’s pack of archaeologist figures (or should that be palaeontologists?!), which come pre-painted and feature appropriate poses for a dig site. In fact, the figure set includes human skeletal remains and a useful tripod.
This proved to be a fun project and the finished scene certainly offers something different. Blending the foam dinosaur section into the surrounding landscape was the main challenge, taking into account the need to include mounds of recently dug earth. I kept these to a minimum but modellers may wish to include some heavy plant and machinery for deeper digs, but my diorama gives an idea of how good the Noch components can look.
What you will need
SHOPPING LIST
◆ Noch • 58614 T-Rex Excavation set (£23.75) • 15043 Archaeologist figure set (£17.25)
Web: www.gaugemasterretail.com
◆ Mifoshape sculpting powder (1.5kg)
Price: £25.00
Web: www.dcctrainautomation.co.uk
◆ WW Scenics WSLF-139/140 Woodland Soil
Price: £5.25 (180ml) – £8.99 (500ml)
Web: www.wwscenics.co.uk
TOOLS
◆ Knife and spare blades
◆ Steel rule
◆ Paintbrushes
◆ Mixing bowl
◆ Small trowel
◆ Electrostatic grass planting tool (optional)
SCULPTURE CLUB
Mifoshape is a sculpting powder from Belgium, which is perfect for creating rock faces and landscape contours. Unlike many regular dry plaster formulas, which tend to dry rapidly, Mifoshape can be manipulated for up to 30 minutes before it begins to set, allowing you to add any desired textures and details to the landscape.
The plaster comes as a dry powder, which is activated by water. Various mixing ratios are possible, which will dictate drying times, while the addition of a little PVA wood glue to the mix will improve adhesion and help ‘plasticise’ the mix, making it easier to spread and manipulate.
The powder has a minimum shelf life of six months once the bag has been opened. A sealing strip is provided to prevent moisture ingress, so remember to seal it tight after use!
To watch a short video of the product and its uses and how to use it go to www.dcctrainautomation.co.uk/mifoshape-sculpting-powder.html
STEP BY STEP

1 This Noch T-Rex excavation scene is rendered in a hard foam material and marketed for ‘HO’ scale, it’s ideal for ‘OO’ or ‘TT:120’ layouts, or even ‘N’ and ‘O’, representing a baby or giant dinosaur!

2 While forming the surrounding landscape from layers of 5mm thick foamboard (available from craft stores such as Hobbycraft), I cut out a rectangular slot for the Noch T-Rex panel to sit within.

3 After test-fitting the T-Rex panel, I removed it while the landscape contouring was achieved with plaster cloth, as this stage can get rather messy.

4 The plaster cloth helped form the rough contours, being stretched over the layered foamboard, but the final shaping would be done with a wet plaster. Mifoshape is a useful powder, ideal for rock faces and landscapes.

5 To improve adhesion and the workability of the Mifoshape, I added PVA glue (10% by volume) to the mix of plater and water, mixing all three components fully until a thick paste was created.

6 A small trowel proved ideal for mixing and applying the Mifoshape paste, which was spread evenly over the dried layer of plaster cloth, to a depth of around 2mm.

7 After about 15 minutes, while the Mifoshape layer was still pliable, I used the blade of the trowel to shape the rock face texture. The mixture remains workable for at least 30 minutes after application.

8 Once the plaster began to dry out, I glued the Noch T-Rex scene into place and then put the diorama aside overnight to let everything dry fully.

9 Next day, the painting stage began. I chose several Woodland Scenics Earth Colours, diluting each about 50/50 with water to create thin washes, which will soak easily into the porous surface.

10 I applied various acrylic paint shades with a sponge, one colour at a time, using a ‘leopard spot’ technique to ensure a random appearance. When it was dry, I applied a thin black wash to highlight the texture.

11 Lightweight plaster or putty can be spread into any gaps and smoothed out with a spatula. I used Foam Putty from Woodland Scenics, which is ready-mixed and easy to use. Leave overnight to dry before painting.

12 To add piles of excavated earth around the dig site, WW Scenics Woodland Soil was carefully shaped into piles. This material is real soil, dried and sifted, and forms part of a new range of products by WW Scenics.

13 The WW Scenics soil was fixed in place using a thin PVA-type adhesive (Woodland Scenics scenic cement), applied from a pipette. The soil is finely textured and provides a useful form of ground scatter material.

14 The next step: the surrounding greenery. As I was going to use a static grass applicator, I made use of Noch’s special applicators (soon to become available separately) to add random blobs of PVA glue.

15 A blend of slightly different shades of short static grass fibres were loaded into my Noch Gras-master electrostatic tool, which was then run over the wet blobs of glue. The scene was left to dry before removing excess fibres.

16 The random patches of greenery looked appropriate for this rocky area of scrub land, creating a realistic transition between the trackbed, rockface and the excavated dinosaur remains.

17 This Noch figure pack offers a quick and straightforward way to make a cameo scene. It provides six archaeologist figures in appropriate garb and poses, along with a human skeleton, tripod and theodolite.

18 To complete the scene, I added some safety fencing from the Busch range, along with a red Ford Ranger truck from the same manufacturer, both from Golden Valley Hobbies (www.goldenvalleyhobbies.co.uk).
Each issue of Model Rail covers every stage of modelling, from buying your first model train set right through to museum standard fine-scale modelling. Find inspiration for your next project with our helpful tips, advice and in-depth detail on model trains and layouts.
Choose the right subscription for you and get instant digital access to the latest issue.